QuickByte: Creating a Windows bootable USB drive in Linux

Creating a Windows bootable USB drive in Linux

I seem to keep forgetting that creating a Windows bootable USB drive is not the same as creating a Linux bootable USB drive, given an iso image of the OS.

Usually dd if ~/path/to/iso_file.iso of /dev/sdx BS=1M will write out an ISO image bit by bit into a target device (USB drive).

But Microsoft can’t make it all so simple right? Windows Bootable devices have three partitions, an empty 4.2MB Partition, a 524KB FAT partition and the remainder as an NTFS partition.

Instead of manually faffing around with partitions yourself, do yourself a favour and install the aptly name woeusb tool.

It has a command line and GUI version. Find the appropriate one. After that it is a simple command

sudo woeusb --device ~/Downloads/Win10_20H2_v2_English_x64.iso /dev/sdd --tgt-fs NTFS

Replace /dev/sdd with whatever your drive your USB is mounted as.

Don’t forget the target-filesystem flag --tgt-fs NTFS because current Windows 10 installers are more than 4 Gigs so cannot be squeezed into a FAT file system which is the default.

I used the Disks utility GUI to stop the USB drive. These days most USB drives if recognised will be auto mounted, so you have to unmount/stop them before you can use dd.

Another issue I found was woeusb kept failing after creating the first partition. I forgot to capture the error message, but it would fail to create the NTFS partition and crash. You could then see the FAT partition in the Disks app.

This fixed itself after a reboot of my Linux box.


If you don’t use woesub and wing it with dd only, you’ll find Windows Setup will initialize, but very quickly get stuck at a screen that claims “Drivers not found” and will implore you to load up Drivers in another media. You might imagine you have to download ‘Motherboard drivers’ or something, but this is not correct. No amount of ‘downloading drivers’ will make the installation proceed. Essentially, Windows setup fails to load NTFS drivers if you don’t have that FAT partition and goes round in circles looking for it.
#MeToo – Things men should get, but don’t!

Last weekend I was faced with (what I thought) was my first #metoo moment. An incident when a lady says “no” and a guy continues to be inconsiderate and idiotic! Then, when pointed out, instead of apologising, walks away pretending to be offended.

We were at a cottage holiday among friends and family. The details of the incident are not important. Fact is it happened so quickly that almost 15 people didn’t notice it, but it didn’t matter that they didn’t notice. A moment of indiscretion in a public setting, made someone uncomfortable, brought back bad memories. The lady responded like most ladies do, retreated from the common area and went and spent some time with herself. Apparently that wasn’t a hint enough for the guy to get the fact that he had done something discomforting and wrong. It wasn’t obvious to him.

As the evening progressed, when the lady joined the group again, the guy went up to her and ‘innocently’ inquired ‘what happened?’. At this point the lady lost it and gave him a proper telling off ending with ‘… for me this is a #metoo moment!’. At that point, everyone’s ears perked up, everyone heard it, and everyone was suddenly aware something had gone wrong. The reaction of that guy and the other guys in the group was an eye-opener for me. None of them actually got what had preceded before that telling off.

There on, instead of focusing on why was there a need for the outburst, guys in the group were – ‘why bring up #metoo?’, ‘both should apologise to each other!’, ‘he didn’t mean to’ WTAF are you talking here mate! You just sounded like the orange faced cretin, where he said ‘there were fine people on both sides’ after Charlottesville, when a pig of a person mowed down a protestor with a car? Yes, you sound like that, when you say ‘both should apologise’… or ‘why did she say it publicly?’… f***’s sake, it happened publicly, so why should it not be said publicly!

I was stunned that the guys were asking these questions or saying these things. For them apparently #metoo was some ‘high bar for nasty, criminal behaviour’. I spent nearly the entire night trying to explain that it wasn’t the case, there was only one person in the wrong here, and only one person needed to apologise. I think I failed. Sadly! While I went and apologised profusely for the evening ruined, to our friend, the rest of the guys were worried about ‘establishing’ wrong behaviour and dissecting ‘why did she say #metoo?’

But things didn’t stop there, it got worse when, during my attempt to apologise for the incident, one of the ladies said “what happened is statistically true given the size of the group”. At this, two guys threw a hissy fit, as to how is that possible? They completely failed to see, it had already happened! Intentional or not, we were in a room where a woman had complained that she was made to feel physically uncomfortable by one of us. Instead of acknowledging that, they were still trying to agree what had happened actually warranted the use of the term #metoo, ugh!

The next day, when everyone had slept it over, before parting ways, the lady made a supreme effort go up to the guy and ask, “I wasn’t in a mood to listen to you last night, is there anything you wanted to say now?”, instead of apologizing profusely, his response (paraphrased) was ‘let bygones be bygones’!

Guys, I am writing this down in hopes that it will get into your head, maybe not today, someday…

  • Social norms and values are very dynamic and fluid, if you are not tuned to them when in a social setting, you should dial yourself down to a point were you approach things conservatively.
  • If you know and are aware of a social boundary, don’t try to push it in the name of occasion, how much alcohol you’ve had, or who initiated a chain of event.
  • If you realise you’ve crossed a boundary, whether on your own or by direct/indirect prompts, the only thing that will fix it is an unconditional apology at the very first opportunity you get. You may not understand why your seemingly innocuous actions were construed as an invasion of privacy or personal space, it only means you need to try to learn more, sincerely. Don’t try to brush it off with a ‘I didn’t mean it’!
  • The longer you take you apologise, the deeper the hurt gets and more difficult it becomes to treat it as an ‘honest mistake’. Taking 72 hours to talk about it, borders on acknowledgement of guilt, and then making it about yourself during the apology just makes it a non-apology and meaningless.
  • It is not about your intention ‘interpreted wrong’, it is about your actions resulting if someone feeling uncomfortable, due to myriad reasons possible.
  • Don’t feign innocence because no one complained to you before. Being human means being different from others in many many ways. You are not expected to know all the ways, but if someone says you goofed up, then admit it, learn from it, apologise genuinely, and back off.
  • Don’t make it about yourself. Getting accused of improper behaviour may come as a surprise, but it shouldn’t shock you into inaction. Quite the opposite, it should shock you into action. If you are among friends, it gives you an opportunity to course correct, introspect and come out a better person. The moment you make it about yourself because ‘it never happened to you before’ or ‘no one said it to you before’ you have lost it and probably the friendship.

Women should NOT have to cry out a hashtag for you to sit up and listen to her disagreements about personal space. Apart from the criminal behaviour that has brought #metoo to the fore, any of the following can bring back bad memories that are hurtful and hence just as detestable and protest-able

  • Every time you ‘did not hear’ her protest about encroachment of private space, however mild it was. A no is a no is a no!
  • Every time you forced a physical contact that may have been appropriate in another scenario (A hug as a greeting is not the same as hugging/touching when, say you are playing a game that doesn’t actually need such interaction)!
  • Every time you don’t try your hardest, to avoid physical contact in a public place, and don’t apologise for contact that was unavoidable (for example – crowded trains, buses, public transport are not a license to ‘lean in’ or ‘touch’),
  • Every time you threatened her with violence (don’t have to perpetuate, just being vocal is bad enough)
  • Every time you questioned a woman’s complaint about being uncomfortable/sick/nauseous etc. about a certain action, speech or gesture.

If you think getting the above is ‘hard’, imagine what goes through women when one or more of those things happens to them in varying frequencies over their lifetime!

For everyone who recognises what I have written here and still say ‘but…’ I present to you, Captain Jean-Luc Picard.

It was a very sobering few days for me, needing much introspection and how I (and guys in general) go about and how women have go about, socially. Even though I wasn’t the aggravator in this case, I have been around women who have been hurt and have not protested, or not been apologised to, for the hurt… it actually took someone near and dear to yell #metoo for me to understand that it happens far too often even in our closest circles. I guess it wasn’t my first #metoo event after all, just the one I heard clearly! Now pardon me while I go introspect my follies and figure out the apologies I owe!


Tagged ,

Setting up PostgreSQL (9.6) on Debian Stretch

I have been trying to setup a home network of connected devices for… lets just say a long time! I have made some progress in recent days and the next step is to start using some sort of backing store to store some values.

While MongoDB works well with the Nodejs stack, it isn’t well supported on Raspbian because Raspbian is 32bit and MongoDB stopped supporting 32 bit fully due to data size restrictions (biggest DB you can have is 2GB). Raspbian Stretch does provide an updated MongoDB but it is still a few (minor versions) short of the shiniest.

However using Jessie Backports I was able to install PostgreSQL 9.6 (the shiniest version). Having installed it, I had no idea what to do next. Here’s my journey to get PostgreSQL to a place where I can start using it.

My dev environment’s base OS is OSX and I run my DB in a VM hosted by VirtualBox. So I have setup a Debian Stretch VM called dev-db before I start with PostgreSQL installation. I am trying to setup a parallel runtime environment on a Raspberry Pi as well so if there are any exceptions to these steps I’ll document them for the Raspbian as well.

Installing on Debian/Raspbian Stretch

Both the distros have the required repositories in the apt list, out of the box, so all you have to do is

sudo apt-get install postgresql-9.6

This will create a PostgreSQL default user called ‘postgres’.

sudo service start postgres

Setting up your User Account

PostgreSQL databases are usually tied to a user. Out of the box, PostgreSQL users are not the same as *nix account users, however, if you a common name between your *nix account and PostgreSQL account things become much easier. So lets assume account I am using to log in to Debian stretch is called ‘dbuser’. It is in the sudoers list and I logged in to the terminal/desktop using it.

First step is to change user from ‘dbuser’ to ‘postgres’ that PostgreSQL created during installation.

sudo -i -u postgres

This is the admin account for postgresql, in a production environment, it is a good idea to protect this with a password at least.

Next step is to tell PostgreSQL, we have a ‘dbuser’ account that we want to be able to use for create databases in PostgreSQL.

postgres@dev-db: ~$ createuser dbuser --pwprompt

It will ask for password, I entered the same password as my *nix account but that may not be a best practice.

Finally create a db for the dbuser

postgres@dev-db: ~$ createdb dbuser

Now log out of the postgres account and go back to dbuser account

postgres@dev-db: ~$ exit
dbuser@dev-db: ~$

Start psql client and you should get logged into the pi database using the PLSQL

dbuser@dev-db: ~$ psql
psql (9.6.4)
Type "help" for help.
pi=>

Enter \q to exit psql.

We have setup PostgreSQL and have established local client access

Enabling remote access

Default PostgreSQL setup enables local client access only. In Dev environment I like to access my VM or PI using a client on my local desktop/laptop. This needs a few additional steps.

Step 1: Open up firewall on VM or Raspberry Pi hosting the DB Server

sudo iptables -A INPUT -s 192.168.0.21 -p tcp --destination-port 5432 -m state --state NEW,ESTABLISHED -j ACCEPT
sudo iptables -A OUTPUT -s 192.168.0.21 -p tcp --destination-port 5432 -m state --state NEW,ESTABLISHED -j ACCEPT

Step 2: Edit PostgreSQL config to allow remote access

Edit the pg_hba.conf file

sudo nano /etc/postgresql/9.6/main/pg_hba.conf

Scroll to the bottom and add the following line

host all all 192.168.0.21/24 trust

Edit the file postgresql.conf

sudo nano /etc/postgresql/9.6/main/postgresql.conf

Find the setting ‘listen_address’ and set its value to the IP address of the VM/Raspberry Pi. This line maybe set commented (starts with #), so uncomment it first.

listen_addresses = '192.168.0.21'

Restart PostgreSQL server

sudo service postgresql restart

You should now be able to access if from a Remote Client.

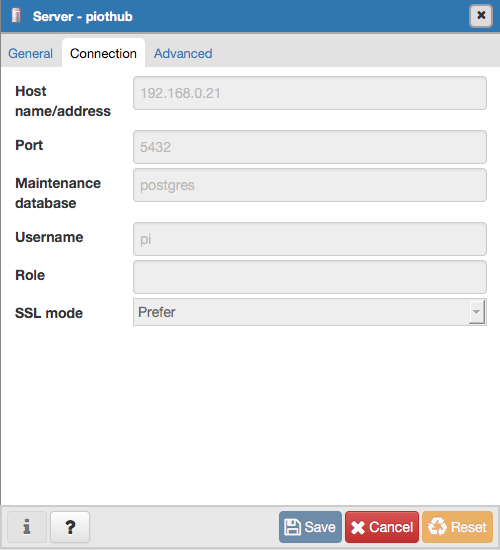
I use the standard pgAdmin 4 and the connection settings were as follows

Screen Shot 2017-09-10 at 5.48.34 PM

And done!

Up next compiling and setting up Redis on the Pi 🙂

Tagged , , ,

Quickbytes: How to connect to MongoDB in a VM, from OSX (bindIP)

I like to keep my base system clean of databases and web-servers etc. So when I wanted to play around with MongoDB on my laptop instead of cluttering it up, I setup a little Virtual Box VM running Debian 8.5 and got MongoDB 3.2 on it in a jiffy using the official docs.
I then installed my favourite MongoDB client Robomongo and was all set to connect to the DB in the VM itself.
But when I installed Robomongo on OSX it just wouldn’t connect to the VM. I assumed its getting blocked by default OS settings on Debian. So I updated the IP Tables as follows
sudo iptables -A INPUT -s 192.168.0.42 -p tcp –destination-port 27017 -m state –state NEW,ESTABLISHED -j ACCEPT
This enables incoming connections to port 27017, MongoDB default port.
sudo iptables -A OUTPUT -s 192.168.0.42 -p tcp –source-port 27017 -m state –state NEW,ESTABLISHED -j ACCEPT
This enabled outgoing connections.
Replace [192.168.0.42] with IP address of you machine/laptop on which the VM is hosted.
I assumed this would be enough but nope. Robomongo on OSX kept refusing to connect with the error “Network is not reachable”. After running up lots of wrong trees I finally found out that MongoDB forces local IP binding by default as a security measure. This setting is in /etc/mongod.conf
net:
port: 27017
bindIp: 127.0.0.1
I changed the bindIp to [127.0.0.1,192.168.0.42]. Final settings were:
net:
port: 27017
bindIp: [127.0.0.1,192.168.0.42]
Save the conf, restart mongodb service and Bazinga!
Quick vote of thanks to the following articles:
Security Note: Setting bindIP to 0.0.0.0 is the worst move from a security point of view. Do not do it!

How to format a Disk in Debian Jessie

I keep forgetting how to format and label a disk on my Debian system so here’s a quick note to self:
Formatting == Making a File System
Usually adding a new disk means creating a partition first and then making a file system on the partition. I will come back to the creation of partition some other day. For now I just need to format my file system.
We use fdisk to identify partition.
fdisk -l

Disk /dev/sda: 232.9 GiB, 250059350016 bytes, 488397168 sectors
Units: sectors of 1 * 512 = 512 bytes
Sector size (logical/physical): 512 bytes / 512 bytes
I/O size (minimum/optimal): 512 bytes / 512 bytes
Disklabel type: dos
Disk identifier: 0x8eb2d6f9

Device     Boot     Start       End   Sectors   Size Id Type
/dev/sda1  *         2048 468553727 468551680 223.4G 83 Linux
/dev/sda2       468555774 488396799  19841026   9.5G  5 Extended
/dev/sda5       468555776 488396799  19841024   9.5G 82 Linux swap / Solaris

Disk /dev/sdb: 931.5 GiB, 1000204886016 bytes, 1953525168 sectors
Units: sectors of 1 * 512 = 512 bytes
Sector size (logical/physical): 512 bytes / 4096 bytes
I/O size (minimum/optimal): 4096 bytes / 4096 bytes
Disklabel type: dos
Disk identifier: 0xf8b85d91

Device     Boot Start        End    Sectors   Size Id Type
/dev/sdb1        2048 1953521663 1953519616 931.5G  7 HPFS/NTFS/exFAT

Disk /dev/sdc: 111.8 GiB, 120034123776 bytes, 234441648 sectors
Units: sectors of 1 * 512 = 512 bytes
Sector size (logical/physical): 512 bytes / 512 bytes
I/O size (minimum/optimal): 512 bytes / 512 bytes
Disklabel type: dos
Disk identifier: 0x9fd1cfdb

Device     Boot Start       End   Sectors   Size Id Type

/dev/sdc1        2048 234441647 234439600 111.8G 83 Linux
As seen above the disks are /dev/sda, /dev/sdb and /dev/sdc Each of them have their own partitions
I want to ‘format’ the /dev/sdc drive, but I already have a partition on it, so I don’t need to create a partition.
To format, I need to unmount the file system first. I did it by right clicking it on Dolphin file system manager and click the Unmount context menu. You can use the umount command as well.
Once unmounted you format it using the following
sudo mkfs.ext4 /dev/sdc1   
The above command give the following output
mke2fs 1.42.12 (29-Aug-2014)
/dev/sdc1 contains a ext3 file system labelled 'WinVM'
        last mounted on /media/sumitkm/WinVM on Sun May 22 16:13:34 2016
Proceed anyway? (y,n) y
Discarding device blocks: done
Creating filesystem with 29304950 4k blocks and 7331840 inodes
Filesystem UUID: 6fdb55c8-95f9-4591-a76e-f5b0ab85a606
Superblock backups stored on blocks:
        32768, 98304, 163840, 229376, 294912, 819200, 884736, 1605632, 2654208,
        4096000, 7962624, 11239424, 20480000, 23887872
                                                                                                                        
Allocating group tables: done
Writing inode tables: done
Creating journal (32768 blocks): done
Writing superblocks and filesystem accounting information: done
Dolphin will auto mount it but it will use a big GUID as its label. To fix the label use the e2label command
First we check for existing label and it comes back blank
sudo e2label /dev/sdc1
Next, we apply the label WinVM
sudo e2label /dev/sdc1 WinVM
Next, we check the label again and confirm it is WinVM
sudo e2label /dev/sdc1

WinVM
Finally, don’t forget to change owner. Since our mount point was previously defined, it will be picked up automatically as soon as you apply the label. However the ownership is changed to root. Change ownership back to owner yourself using the chown command
chown -R sumitkm /media/sumitkm/WinVM

Where sumitkm is the username and the folder is the mount folder.

Taa daa, you are done!
P.S. This happens to be my first post using my custom built Electron JS based blog editor for Linux and OSX. Check it out at https://github.com/sumitkm/electricedit (A how to article on Electron JS has been in the works for the last 4 months now ;-)… will see the light of the day someday)
Tagged , ,